5. Price levels
Price Levels in Dynamics GP can help
automate correct pricing on Sales Order Processing transactions and
greatly speed up data entry. A customer is assigned a price level and
inventory items can be set up with different prices for each price
level. During transaction entry, Dynamics GP will automatically select
the item price corresponding to the customer's price level. Price levels
and individual item prices can still be changed on any transaction.
Using price levels is optional, but you will want to set up a default
one, even if you are not going to be using price levels.
To set up price levels, navigate to Microsoft Dynamics GP | Tools | Setup | Sales | Receivables and click the Price Level hyperlink. The only thing needed to set up a price level is an ID of up to 10 characters. The Description is helpful, but optional.
6. Customer classes
Customer classes in Dynamics GP are optional, but they are recommended as they offer the following three benefits:
Time saved when creating customers:
Classes are used as a template for most of the customer settings, so
they can offer significant time savings when creating new customers in
Dynamics GP.
Time saved during customer updates:
Changes to a customer class can be rolled down to all customers in that
class, which makes changes to groups of customers significantly faster
and easier.
Reporting, filtering, and searching:
Most reports and searches in Dynamics GP offer an option to filter by
customer class. For example, when printing a Receivables Aged Trial
Balance, the customer class or a range of classes can be used as a
filter.
To set up customer classes, click the Classes button on the Receivables Management Setup window or navigate to Microsoft Dynamics GP | Tools | Setup | Sales | Customer Class.
All the settings for a customer class will be defaulted when a new
customer is created in that customer class. Any individual customer
setting can be changed at any time, regardless of customer class. The
following list explains the fields on the Customer Class Setup window:
Class ID: This is a 10-character ID
for the customer class, which cannot be changed once saved. When
filtering by customer class on most reports, there will be one to/from
range available. If there are certain customer classes that will
typically be reported on together, make sure their Class IDs start with
the same characters so that they are sorted together in a list. For
example, if you have three retail classes and four partner classes, and
you will typically want to report on all retail customers separately
from all partner customers, you could add the prefixes R and P to all the Class IDs.
Default checkbox: One customer class
can be set as the default class. Once set, newly created classes will
copy all the settings from the default class. This can help save time
when setting up customer classes that are similar. The default class can
be changed at any time by selecting the Default checkbox on another class. This will automatically uncheck the Default checkbox on the class that was previously the default class.
Description: A description of the
customers in this class. This is used to help users identify the proper
class to choose when creating customers.
Balance Type: Open Item is the
balance type most companies use for their customers. This keeps track of
all transactions with their individual balances separately. When Balance Forward
is used as the balance type, transaction details are kept only for
transactions that are not yet due and all other transactions are
consolidated into one total balance for the customer.
Finance Charge: This setting determines whether customers in the customer class are assessed finance charges and, if yes, whether they are Percent or Amount.
Minimum Payment: If there is a minimum payment customers must pay, this setting can determine whether it is a Percent or Amount. The calculated minimum payment based on this setting can be shown on customer statements.
Credit Limit: If a credit limit is
set up, users will receive a warning when they enter transactions
exceeding the credit limit and will need to type in a password to
override the limit if an Exceed Credit Limit Password is entered on the Receivables Setup Options window ( Microsoft Dynamics GP | Tools | Setup | Sales | Receivables).
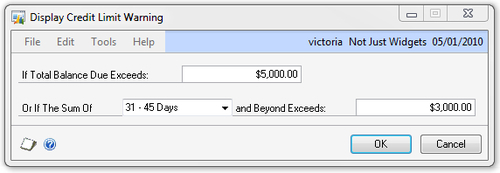
The expansion button (blue arrow) to the right of the Credit Limit Amount opens a Display Credit Limit Warning
window where you can set up
additional options for showing a credit limit warning to users during
transaction entry, even if the transaction being entered will not exceed
the customer's credit limit. This is useful to fl ag new transactions
for customers that are not meeting their payment terms. For example,
with the settings shown in the following screenshot, users will see the
credit limit warning if a new transaction is going to make the
customer's total balance exceed $5,000, or if their 31 to 45 days and over balance exceeds $3,000:
Writeoff: A typical recommendation is
to allow users to enter small writeoffs, maybe up to $25, and restrict
higher writeoffs with a password that is entered on the Receivables Setup Options window (Microsoft Dynamics GP | Tools | Setup | Sales | Receivables). If Not Allowed is chosen, it may restrict some of the transaction options that users have.
Revalue Customer: Select whether you
will be revaluing transactions for customers in this class, and if yes,
whether the gain/loss should go to the Receivables/Discount Account or the Sales Offset Account. Account Revalue Customer
is checked by default whether or not you are using the Multicurrency
module in Dynamics GP. Leaving it checked when not using Multicurrency
will not cause any harm.
Order Fulfillment Shortage Default: Determines the item quantity shortage option that will default on Sales Order Processing transactions. Most companies choose Back Order Remaining for this option.
Trade Discount: A trade discount is
an across-the-board discount on sales, so if a customer has a 5% trade
discount and you enter a sales transaction for $1,000, a $50 discount
will automatically be calculated. Trade discounts are useful in
situations where you want to track the discount in a separate General
Ledger account.
Payment Terms: Select the default payment terms for this class of customers.
Discount Grace Period and Due Date Grace Period: These work together with the Use Customer/Vendor Grace Periods for Date/EOM Payment Terms option on the Payment Terms Setup window. You can enter up to 99 days for each of these settings.
Salesperson ID: If you are using
salespeople and there is a salesperson who will most often be used for
customers in this class, you can enter their Salesperson ID here.
Typically, the salesperson is set up individually for each customer.
Territory ID: If there is a sales territory that will most often be used for customers in this class, you can select it here.
Shipping Method: Enter a default Shipping Method ID for customers in this class.
Tax Schedule ID: If you are
calculating sales taxes and most of the customers in this class use the
same Tax Schedule ID, you can enter it here. Unless your customer
classes are set up geographically, most often the Tax Schedule ID will
be different for each customer and it is easier to leave this blank.
Price Level: Select a default price level for customers in this class.
Currency ID and Rate Type ID: Select the default currency and rate type for the customers in this class.
Priority: Priority is an additional
grouping available for customers and can be used to determine which
customers get orders filled first when automatically allocating
inventory for open orders in the Sales Order Processing module. Either None or numeric values from 1 to 99 are available for the Priority option. If not used for inventory allocation, this is another field that can be used for report filtering or grouping.
Statement Cycle: The statement cycle
can be used as a filter when aging receivables transactions or printing
customer statements in Dynamics GP. It is unusual for companies to have
different statement cycles for different customers, but if it is a need
this setting can be used.
Maintain History: It is recommended to keep all history and leave all the boxes selected for history tracking.
The following screenshot is an example of the Customer Class Setup window:
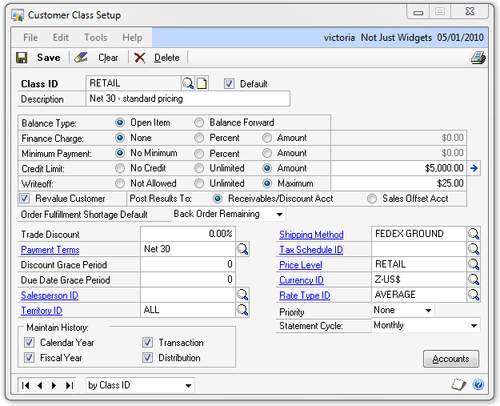
Note that the only required field for a customer class is the Class ID. You can fill in as much or as little detail as you need when setting up a customer class.
Accounts for customer classes
Clicking the Accounts button on the Customer Class Setup window opens the Customer Class Accounts Setup
window. These accounts are the defaults that will be used for
receivables transactions and it is recommended to set these up to save
time when creating customers.
If these accounts are the same for all customers in the company, it may be easier to set them up on the Posting Accounts Setup window instead (Microsoft Dynamics GP | Tools | Setup | Posting | Posting Accounts).
Dynamics GP determines GL accounts to use for receivables transactions using the following logic:
Use accounts set up for the customer. These
accounts will default from the customer class when a customer is being
created, but can be changed for each individual customer.
If any accounts are missing from customer setup, use posting accounts for the company (Microsoft Dynamics GP | Tools | Setup | Posting | Posting Accounts).
If
any accounts are still missing, leave the accounts blank. Transactions
will give a warning and will not post if any required GL accounts are
missing.
Some accounts may never be used for your Dynamics GP
implementation, for example, if you are not tracking discounts available
in the GL, there is no reason to set up a Terms Discounts Available
account. However, it is recommended to fill in as many accounts as may
be used on transactions to save time and effort during transaction
entry.
The Customer Class Accounts Setup window also has an option to set up a Checkbook ID.
This setting can be useful if you are using multiple bank accounts and
certain customer payments always go into one bank account, while others
go to a different bank account. If there is one main checkbook used by
the company, leave this blank and instead select a default Checkbook ID
on the Receivables Management Setup window. That way, any changes in the future will only need to be made in one place. It is recommended to leave the Cash Account from setting on Checkbook to avoid bank reconciliation issues.